Unzip the file wherever you want, but remember where you put it because you’ll need it later.
On OS X, move the entire MonkeyTalkIDE folder into your applications folder and double click on the MonkeyTalk.app to run it.
On Windows, move the entire MonkeyTalkIDE folder into your Program Files folder and double click on the MonkeyTalk.exe file to run it. (Note: If you choose to put the MonkeyTalkIDE folder in your Program Files folder, you will have to choose a different location for your workspace.)
How to install iOS Agent
Once you’ve installed MonkeyTalk, you’ll need to install the iOS Agent. Follow the steps below to do that.
Duplicate your application’s build target by right-clicking on it and selecting ‘Duplicate’ from the menu. A new target will be created called YourApp copy.
Rename the target to something more appropriate.
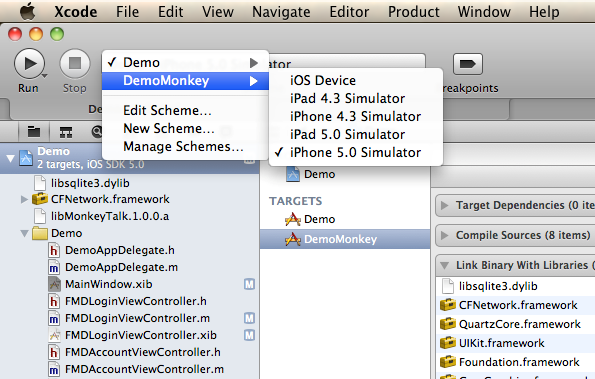
Next, select the scheme from the “Managing Scheme” menu as shown below
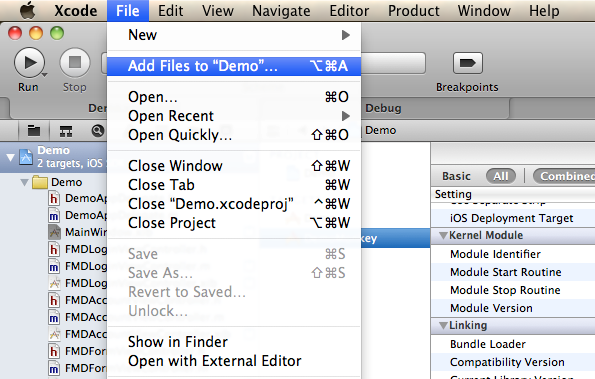
Add the downloaded MonkeyTalk lib to your project File > Add to “YourApp”…from the menu
When the dialog box appears, navigate to the directory where you unzipped the MonkeyTalk zip file, and select the MonkeyTalk iOS lib from pathToMonkeyTalkFolder/agents/iOS.
Recursively create groups for any added folders option. Note: It is up to you whether or not you want to copy items into the destination group’s folder.
In the Add to Targets box, deselect YourApp and select YourAppMonkey.
Click Add.
The MonkeyTalk lib should now be visible in your project.
Configuring Libraries and Build Settings
After you’ve installed the iOS Agent, you’ll need to configure the libraries and build settings. To do that
Right-click on the YourAppMonkey build target and select the Build Phases tab.
On the Link Binaries With Libraries tab, you will need to add the libstdc++.6.0.9.dylib libsqlite3.dylib CFNetwork.framework and QuartzCore.framework if your application is not already using them. (These frameworks are required by the MonkeyTalk).
XCode will have added references to the libMonkeyTalk.a library. (Note: if you want to build an iOS 4.x app, make sure you change the UIKit.framework from “Required” to “Optional”)
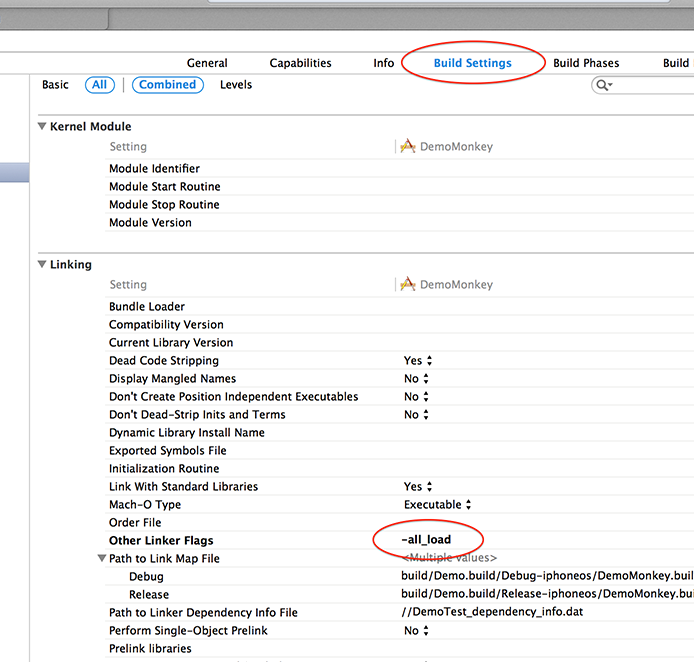
Next, on the Build Settings tab, scroll down to the Linking section and add the following parameter to your Other Linker Flags: -all_load (as shown below).
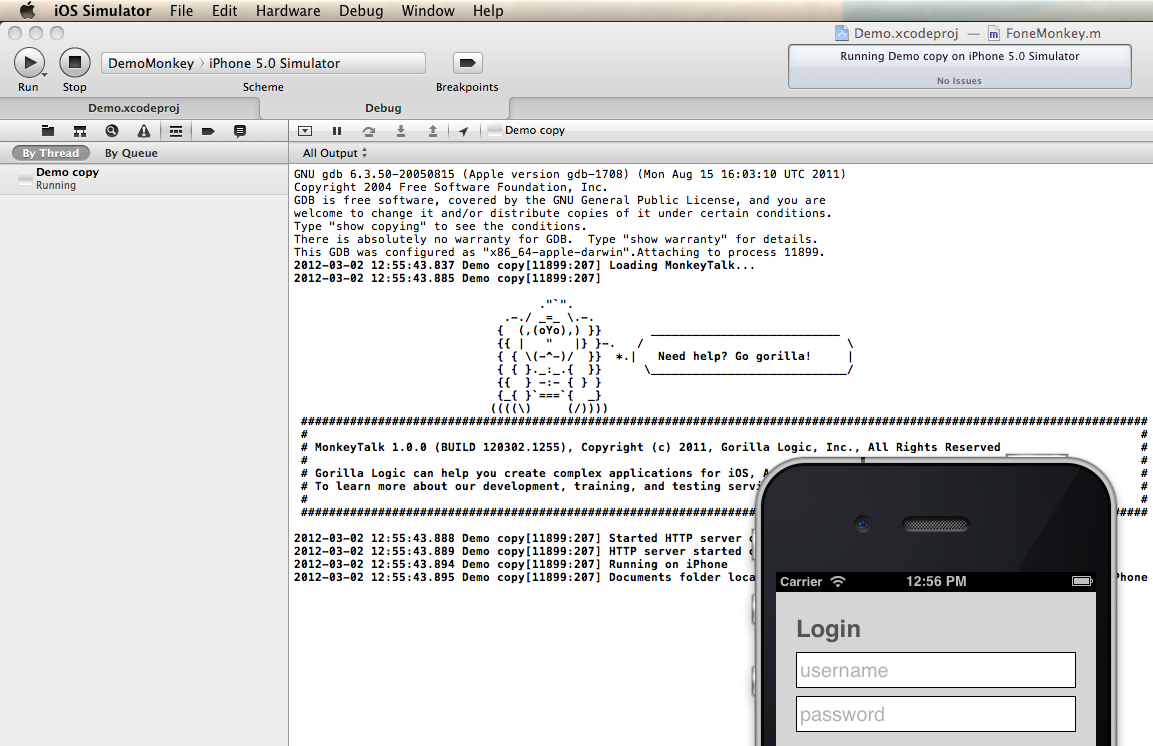
Choose your duplicated test target from the Scheme menu in Xcode and run it on the simulator or your device.
When you do that, you’ll notice that the Log output shows that MonkeyTalk has successfully loaded in your app (as depicted in the screenshot below).
Create a Testing Project for iOS
Now let’s create a test project for iOS which we can record using MonkeyTalk. Follow the steps below to do that.
Open the MonkeyTalk IDE.
Create a test project either from the welcome window that displays when MonkeyTalk is opened for the first time or by clicking “New” tab from the top menu
Save the project to desired location
Now let’s create a test script. To do that right click the project and select the “New” option
Select “Script” from the “New” sub menu
Save the script to its parent folder
Testing on iOS Simulator
Now let’s test our sample project on the iOS simulator. To do that you’ll need to have your MonkeyTalk enabled app running on your Simulator. Once you’ve got the app running:
In the MonkeyTalk IDE, click on the connection dropdown button in the tool bar (on the initial start-up screen this is the green android icon).
Select the iOS simulator from the list.
When you do that the connection confirmation message will display in the console (as shown below).
Testing on iOS Device
To connect your iOS device with the MonkeyTalk IDE use following steps:
Open the IDE
Start up your iOS device, connect it to your local wireless network and load it with your MonkeyTalk enabled app.
Click on the connection dropdown button on the tool bar (this is the green android icon you see on the initial start-up screen)
Choose the “Networked iOS device…” option
Enter the IP address of the mobile device.
If the connection is successful, a message to that effect should appear in the console.
Please note that for this to work, both the IDE and your mobile device should be on same network.
Recording through the MonkeyTalk IDE
To record the app’s UI interactions through the MonkeyTalk IDE, follow the steps below.
Pull up your application on the device.
Click “Record” on the MonkeyTalk IDE.
Note: If the buttons are disabled it means that your device/simulator is not connected with the IDE.
When the recording is complete, click the Stop button to stop the recording
Click the Play button to play back the test
All the results from the execution of test will display in the console. You’ll notice that displays the status and result of each testing command executed. These commands are shown in three different formats
Table view
MonkeyTalk
JavaScript
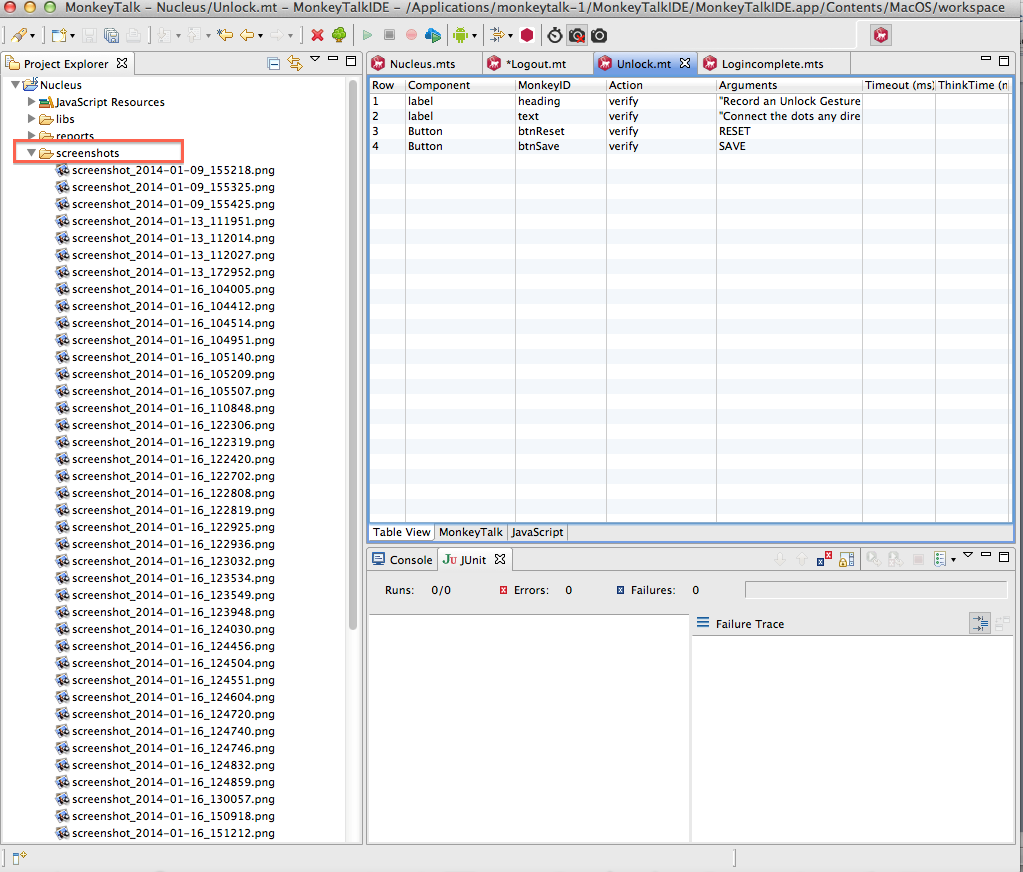
The scripts used are editable after recording. You can even write these scripts without recording if you like. You can also view the screen shots for every command executed, these are saved under the screenshots folder (as depicted below).
How to add accessibility variable
Since MonkeyTalk records each user interface action as a Command, every MonkeyTalk Command has the same simple format:“Component MonkeyId Action Arguments”
In this command, the Component is stands for the UI component used, for example a Button or Input field. These components are platform-independent by the way.
The MonkeyId identifies which Component is being specified. For example, the OK button or the Cancel button. An asterisk (*) is used as a wildcard to match the first component found of the specified component type.
The Action referred to in the command is the UI interaction being recorded, for example, Tap or EnterText. The Arguments being referred to are additional values that are needed to describe the action.
Monkey talk gives a unique MonkeyID to every component during its execution. This ID is usually based on the accessibility variable each component has. If a particular component doesn’t have an accessibility variable assigned, then MonkeyTalk assigns a random ID to it during recording. This ID will depend on the position of the UI component.
The problem with this MonkeyTalk defined ID is that the next time when the test is executed, this ID will not be found by MonkeyTalk since it was randomly generated at the time of recording. To solve this issue you’ll need to assign labels to all the components. You can add these accessibility variables by following the steps below:
Open the project in Xcode
Open the Story board for the project
Select the UI component
Go to Properties
Enter the “Label” for that component
And that’s it. Hope you guys find this post useful.
As a leading mobile app development company (iPhone, Android, Windows Phone, HTML5 app development), Folio3 specializes in native app development services and cross platform mobile app development services for the iPhone and iPad. We also offer extensive mobile app testing and QA services. If you have a mobile app idea that you’d like to discuss please or would like to know more about our iPhone app development services, please Contact Us. Learn more about our iPhone, Android and Windows Phone app development services.








COMMENTS ()
Tweet