
In today’s rapidly evolving educational landscape, the demand for robust Learning Management Systems (LMS) like Moodle is at an all-time high. To meet the ever-growing expectations of educators and learners, it’s imperative to leverage cutting-edge technologies for seamless integration/continuous deployment (CI/CD).
In this blog post, we’ll explore how to implement CI/CD for Moodle LMS on Azure Containerized Apps using GitHub Actions, revolutionizing your deployment process.
Follow the below steps to implement CI/CD for Moodle LMS on Azure Containerized Apps using GitHub Actions:
To begin the setup process for deploying Moodle LMS, ensure the prerequisites, i.e., Azure CLI, are up-to-date and authenticated by executing the command “az login.” Moreover, verify that you have the latest version of the Container Apps Azure CLI extension by running the command:
az extension add -n containerapp –upgrade
Additionally, register the required providers with commands like:
az provider register —namespace Microsoft.App
az provider register —namespace Microsoft.OperationalInsights
Following that, set up essential environment variables required for subsequent commands, such as RESOURCE_GROUP, ENVIRONMENT_NAME, LOCATION, STORAGE_ACCOUNT_NAME, and CONTAINER_APP_NAME etc.
Proceed by creating a resource group to contain your resources using the command “az group create” and set up a Container Apps environment using the following command:
Az containerapp env create \
–name $ENVIRONMENT_NAME \
–resource-group $RESOURCE_GROUP \
—location “$LOCATION” \
–query “properties.provisioningState“
Incorporating volume mounting is a crucial aspect of containerized applications; it can enable persistent storage, data sharing, configuration flexibility, and robust backup solutions.
Azure Containerized Apps doesn’t provide an out-of-the-box solution for volume mounting, so it can be achieved using Azure storage services such as Azure Files.
Before provisioning our Azure Containerized Apps, establish a storage account and file share to mount to the GitHub actions container app. Define a unique name for your storage account and create it using:
az storage account create \
–resource-group $RESOURCE_GROUP \
–name $STORAGE_ACCOUNT_NAME \
–location “$LOCATION” \
–kind StorageV2 \
–sku Standard_LRS \
–enable-large-file-share \
–query provisioningState
Create a file share within this storage account using “az storage share-rm create,” ensuring the desired quota and protocols are specified.
az storage share-rm create \
–resource-group $RESOURCE_GROUP \
–storage-account $STORAGE_ACCOUNT_NAME \
–name $STORAGE_SHARE_NAME \
–quota 1024 \
–enabled-protocols SMB \
–output table
Retrieve the storage account key required for creating the storage mount using:
STORAGE_ACCOUNT_KEY=`az storage account keys list -n $STORAGE_ACCOUNT_NAME –query “[0].value” -o tsv`
Define a name for your storage mount and create it, linking the environment and file share with:
az containerapp env storage set \
–access-mode ReadWrite \
–azure-file-account-name $STORAGE_ACCOUNT_NAME \
–azure-file-account-key $STORAGE_ACCOUNT_KEY \
–azure-file-share-name $STORAGE_SHARE_NAME \
–storage-name $STORAGE_MOUNT_NAME \
–name $ENVIRONMENT_NAME \
–resource-group $RESOURCE_GROUP \
–output table
This command links the GitHub actions container app environment and the file share created with the “az storage share-rm” command.
Now that the storage account and environment are seamlessly integrated, the next step involves configuring a GitHub actions container app to leverage this established storage mount. Define a unique identifier for the GitHub actions container app, such as “moodle-app.”
Next, execute the Azure CLI command below to create the GitHub actions container app, ensuring to specify pertinent details such as the chosen image (e.g., “moodlehq/moodle-php-apache:8.0”), the desired range for replicas, the target port, and external ingress:
az containerapp create \
–name $CONTAINER_APP_NAME \
–resource-group $RESOURCE_GROUP \
–environment $ENVIRONMENT_NAME \
–image moodlehq/moodle-php-apache:8.0 \
–min-replicas 1 \
–max-replicas 1 \
–target-port 80 \
–ingress external \
–query properties.configuration.ingress.fqdn
Upon execution, this command will furnish the URL of the newly created container app.
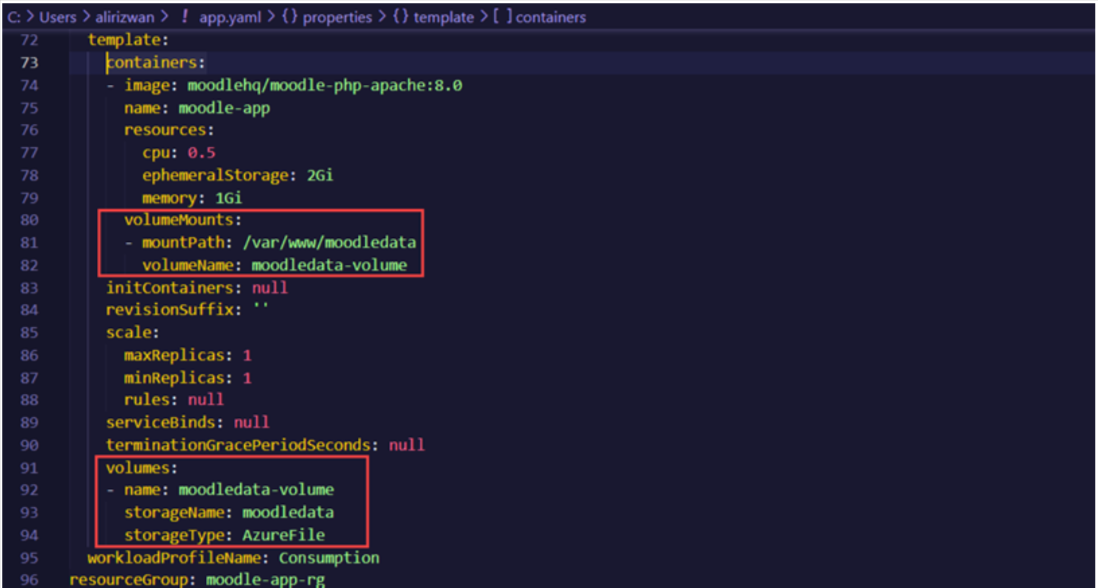
With the GitHub actions container app configured, attention shifts to updating it with a storage mount definition. Initially, the container app’s configuration is exported into a YAML file named “app.yaml” using the Azure CLI.
az containerapp show \
–name $CONTAINER_APP_NAME \
–resource-group $RESOURCE_GROUP \
–output yaml > app.yaml
This file’s “volumes:” definitions should be updated to refer to the established storage volume. Additionally, a “volumeMounts” section should be included in the “Moodle” container within the “containers” section of the YAML file, as shown below.
Lastly, update the container app with the new storage mount configuration using the Azure CLI:
az containerapp update \
–name $CONTAINER_APP_NAME \
–resource-group $RESOURCE_GROUP \
–yaml app.yaml \
–output table
The GitHub actions container app is now enhanced with the updated storage mount configuration, elevating its functionality and readiness for professional deployment scenarios.
Upon provisioning the Azure Containerized app with default Moodle development, the subsequent deployment of modified Moodle code and custom Dockerfile, configuration files, cron jobs, or .ini files becomes feasible.
In this context, Azure Containerized Apps offer support for implementing continuous integration and continuous deployment (CI/CD) methodologies through integration with GitHub and GitHub actions.
However, before initiating this process, specific prerequisites must be established. These prerequisites encompass the setup of a GitHub organization, an Azure Container Registry and Docker Hub registry, and the creation of a service principal for authentication purposes.
Such preparatory measures establish a robust groundwork for facilitating potential CI/CD workflows within the Azure Containerized app environment.
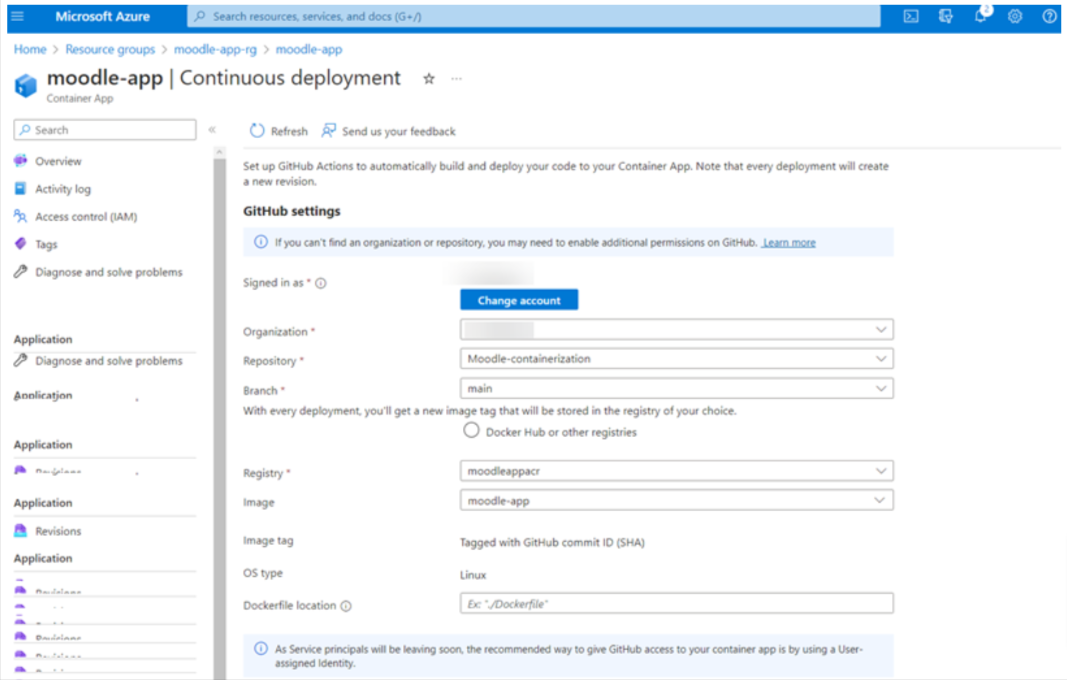
Establishing continuous integration/deployment (CI/CD) capabilities involves configuring the necessary parameters within the Azure Containerized app settings.
Under the dedicated section for constant deployment, users can define the appropriate GitHub organization and specify the repository and branch for continuous deployment.
Additionally, provision container registry details and, if applicable, specify the path to the Dockerfile within the repository (this step is optional if the Dockerfile resides at the repository’s root path).
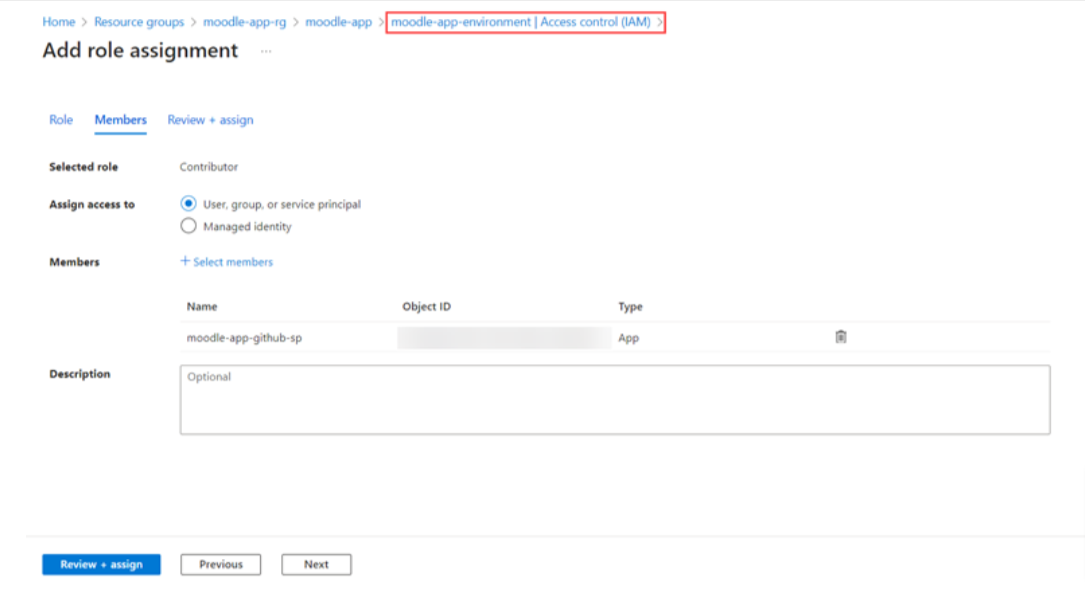
Including service principal information ensures seamless authentication and execution of GitHub Actions. This service principle must be incorporated into the Identity and Access Management (IAM) roles of the Azure Containerized App Environment and the Azure Container Registry (ACR).
Upon the conclusion of the setup process, a GitHub workflow will automatically generate, initiating a GitHub action. Developers can tailor the workflow of YAML files to their specific needs if necessary.

Following the trigger, the action will execute a series of predefined tasks. Initially, it will construct a Docker image based on the provided Dockerfile.
Subsequently, the generated image will be pushed to the Azure Container Registry (ACR). Finally, the deployed image will seamlessly integrate into the Azure Containerized App environment.
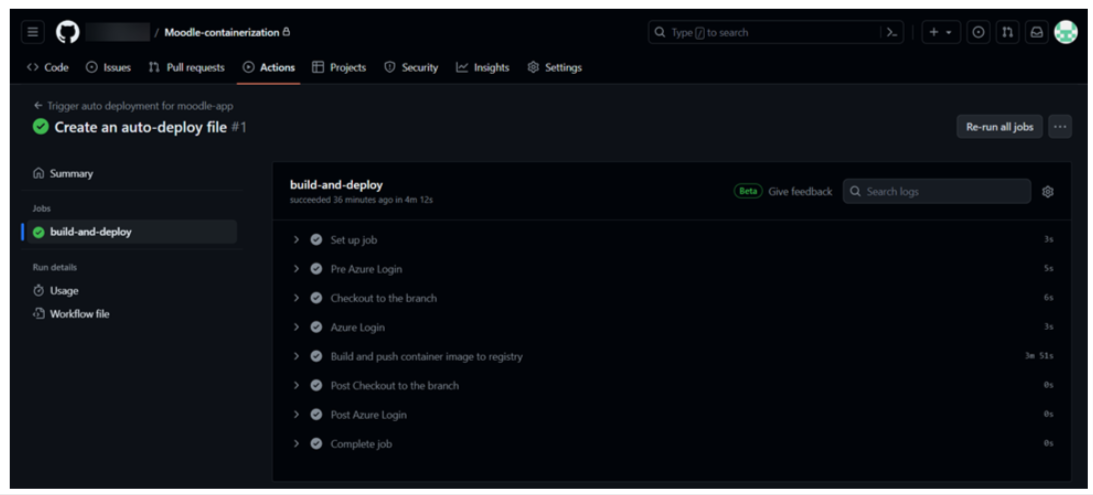
This automated workflow streamlines the deployment process, eliminating manual intervention and ensuring consistent and reliable delivery of software updates.
By leveraging this robust CI/CD pipeline, organizations can enhance operational efficiency, accelerate software deployment cycles, and maintain a competitive edge in the rapidly evolving technological landscape.
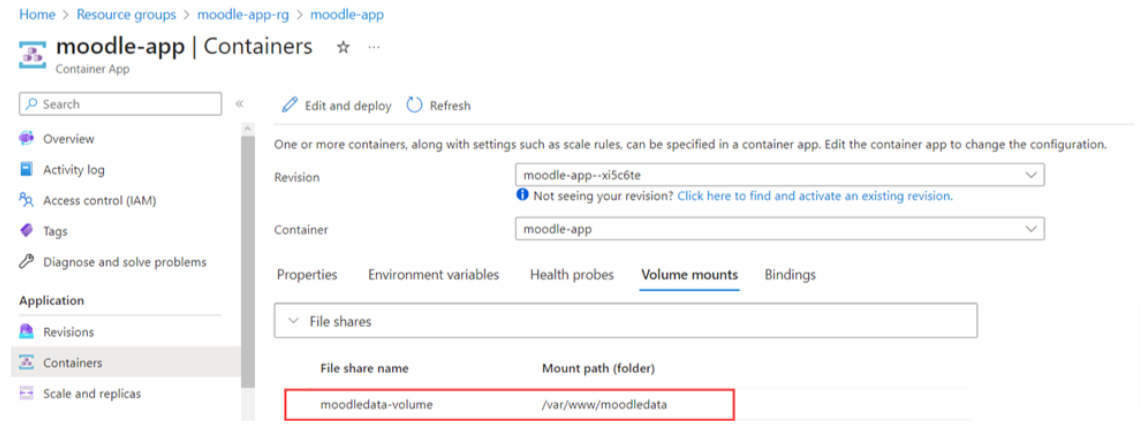
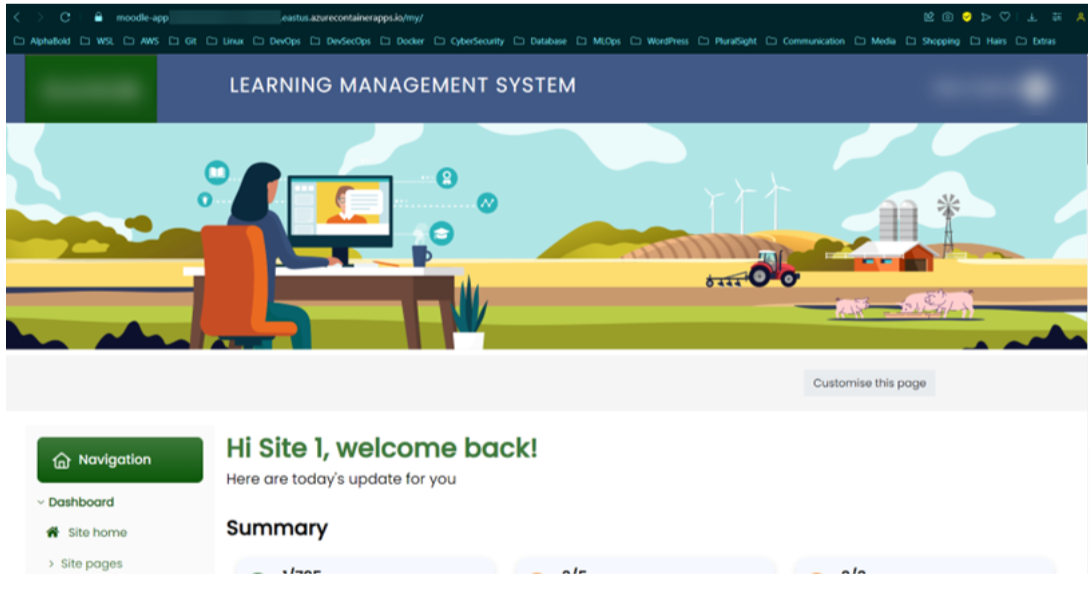
To validate the successful deployment, access the provided URL of the Containerized App, where the application will be readily accessible.
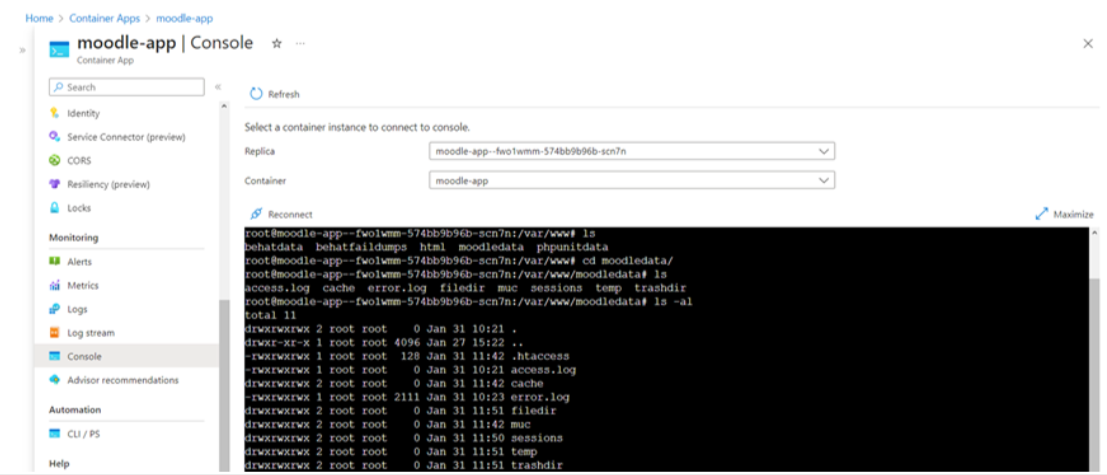
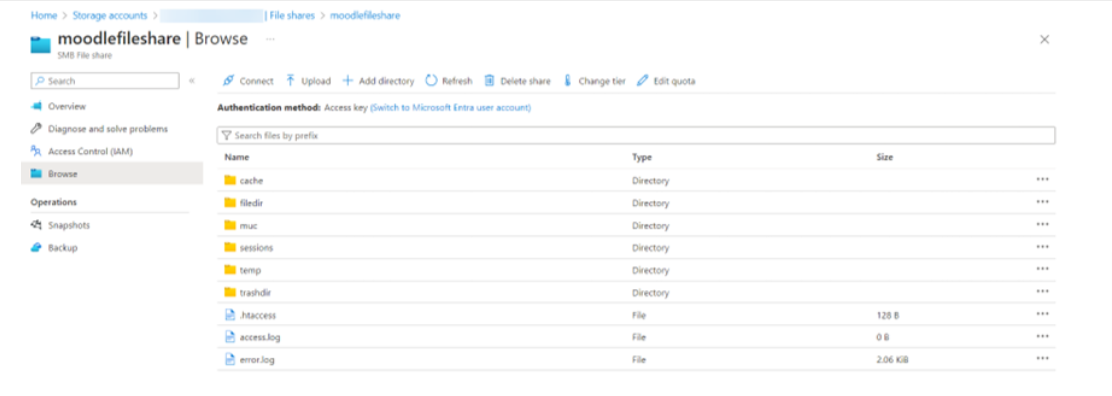
Additionally, a systematic testing approach can be employed to ensure the synchronization of defined volumes. This involves comparing the container content through console commands with the corresponding file share content in the associated storage account.
In addition to the core deployment process, businesses can take several supplementary steps to optimize the functionality and performance of their Azure Containerized app.
Firstly, adjusting scaling and replica options provides flexibility to tailor resource allocation based on evolving needs and cost considerations. This strategic approach ensures efficient resource utilization while accommodating fluctuating demand patterns.
Furthermore, integrating a custom domain enhances the application’s business appeal and reinforces brand identity. Businesses can establish a more substantial online presence and foster user trust and engagement by associating the application with a recognizable domain name.
Enabling application monitoring tools such as New Relic proves invaluable for advanced functionality and performance monitoring. Integrating New Relic into the Azure Containerized app environment enables real-time performance insights, proactive issue detection, and optimization opportunities.
Businesses can include specific commands within the Dockerfile to seamlessly incorporate New Relic monitoring. This enables automated installation and configuration of the New Relic agent, ensuring hassle-free integration and minimal disruption to existing workflows.
RUN \
curl -L https://download.newrelic.com/php_agent/archive/10.5.0.317/newrelic-php5-10.5.0.317-linux.tar.gz | tar -C /tmp -zx && \
export NR_INSTALL_USE_CP_NOT_LN=1 && \
export NR_INSTALL_SILENT=1 && \
/tmp/newrelic-php5-*/newrelic-install install && \
rm -rf /tmp/newrelic-php5-* /tmp/nrinstall* && \
sed -i \
-e ‘s/“REPLACE_WITH_REAL_KEY”/”<REPLACE_WITH_REAL_KEY>”/‘ \
-e ‘s/newrelic.appname = “PHP Application”/newrelic.appname = “moodle-app”/’ \
-e ‘s/;newrelic.daemon.app_connect_timeout =.*/newrelic.daemon.app_connect_timeout=15s/‘ \
-e ‘s/;newrelic.daemon.start_timeout =.*/newrelic.daemon.start_timeout=5s/’ \
/usr/local/etc/php/conf.d/newrelic.ini
Integrating CI/CD methodologies within Azure Containerized Apps offers a transformative approach to deploying and managing Moodle LMS applications.
By leveraging GitHub Actions and Azure services, organizations can streamline deployment processes, enhance operational efficiency, and maintain the agility needed to adapt to evolving demands.
Furthermore, incorporating supplementary steps, such as volume mounting and advanced monitoring with tools like New Relic, underscores a commitment to optimizing performance and reliability.
Navigating the complexities of modern technology, embracing CI/CD practices on Azure Containerized Apps empowers organizations to deliver seamless, high-quality digital experiences while staying ahead in the competitive landscape.
USA408 365 4638
1301 Shoreway Road, Suite 160,
Belmont, CA 94002

COMMENTS ()
Tweet